c++ Multithreading programming 学习(4)

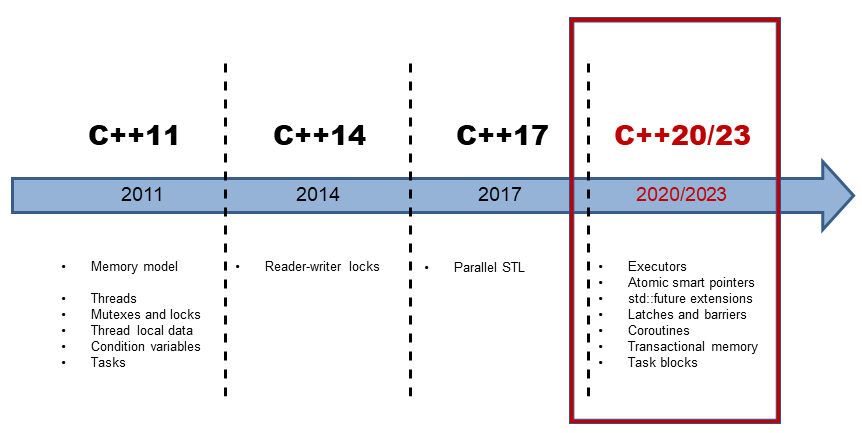
先放一张c++ 特性在不同版本的线路图:

线程创建
构造一个thread对象,可以传入参数,这些参数are either moved or copied by value. 如果我们要传入一个引用,需要std::ref。 新的线程创建之后即有可能被执行,至于是当前线程下一条语句先执行还是新线程先执行取决于操作系统的调度策略。
void f1(int n)
{
    for (int i = 0; i < 5; ++i) {
        std::cout << "Thread 1 executing\n";
        ++n;
        std::cout << n << std::endl;
        std::this_thread::sleep_for(std::chrono::milliseconds(10));
    }
}
int main()
{
    int n = 5
    std::thread t2(f1, n + 1); // pass by value
    t2.join();
    std::cout << n << std::endl;
}
join & detach
join是等待线程完成执行,在等待过程中会阻塞当前*this 线程执行。 detach是将线程分离出去独自完成,被分配给分离线程的资源会在这个线程执行完后自动释放。我们需要在thread对象析构前决定是将它join还是detach,否则thread在析构时叫调用std::terminate()并导致进程异常退出. joinable()用来检测线程是否是活跃的线程,是则返回true,如果一个线程已经执行完毕但是还没有被joined,调用joinable也会返回true。
线程管理
std::this_thread::get_id() 返回当前线程id
std::this_thread::yeild() 让出处理器,让其他线程可以被调用。比如说busy wait时让出。
std::this_thread::sleep_for() 使当前线程停止一段时间。
std::this_thread::sleep_until() 使当前线程停止到指定时间。
once_flag() 和call_once(once_flag& flag, Callable&& f, Args&&... args) 即便在多线程concurrent情况下,确保f只被call了一次。
对于get_id()来说,这里返回的应该是底层所对应的thread id。 我们用native_handle() 来看一下, native_handle() 可以让我们直接用底层库(POSIX on Linux or Windows API on Windows)来操作线程。
#include <iostream>
#include <pthread.h>
#include <thread>
#include <mutex>
int main(int argc, const char** argv) {
  std::mutex iomutex;
  std::thread t = std::thread([&iomutex] {
    {
      std::lock_guard<std::mutex> iolock(iomutex);
      std::cout << "Thread: my id = " << std::this_thread::get_id() << "\n"
                << "        my pthread id = " << pthread_self() << "\n";
    }
  });

  {
    std::lock_guard<std::mutex> iolock(iomutex);
    std::cout << "Launched t: id = " << t.get_id() << "\n"
              << "            native_handle = " << t.native_handle() << "\n";
  }

  t.join();
  return 0;
}
这个程序打印出的是
Launched t: id = 139958647310080
            native_handle = 139958647310080
Thread: my id = 139958647310080
            my pthread id = 139958647310080
可以看到,在POSIX平台上,native_handle()所拿到的id就是pthread_self() 返回的pthread_t(注意:不是pid_t!!),而get_id()和这个值相同。那么知道了id有什么用呢?我们可以根据thread id来设置cpu affinity。尽管我们可以通过在命令行输入 taskset -c $cpuid ./program来限制我们想在哪些cpu上运行程序,但是我们有时更希望可以在程序内部设定。这时我们就需要用到pthread_setaffinity_np了,注意这里我们不能使用这篇博客提到的sched_setaffinity因为native_handle()返回的是pthread_t而不是pid_t。
int main(int argc, const char** argv) {
  constexpr unsigned num_threads = 4;
  // A mutex ensures orderly access to std::cout from multiple threads.
  std::mutex iomutex;
  std::vector<std::thread> threads(num_threads);
  for (unsigned i = 0; i < num_threads; ++i) {
    threads[i] = std::thread([&iomutex, i] {
      std::this_thread::sleep_for(std::chrono::milliseconds(20));
      while (1) {
        {
          // Use a lexical scope and lock_guard to safely lock the mutex only
          // for the duration of std::cout usage.
          std::lock_guard<std::mutex> iolock(iomutex);
          std::cout << "Thread #" << i << ": on CPU " << sched_getcpu() << "\n";
        }

        // Simulate important work done by the tread by sleeping for a bit...
        std::this_thread::sleep_for(std::chrono::milliseconds(900));
      }
    });

    // Create a cpu_set_t object representing a set of CPUs. Clear it and mark
    // only CPU i as set.
    cpu_set_t cpuset;
    CPU_ZERO(&cpuset);
    CPU_SET(i, &cpuset);
    int rc = pthread_setaffinity_np(threads[i].native_handle(),
                                    sizeof(cpu_set_t), &cpuset);
    if (rc != 0) {
      std::cerr << "Error calling pthread_setaffinity_np: " << rc << "\n";
    }
  }

  for (auto& t : threads) {
    t.join();
  }
  return 0;
}
mutex
mutex C++11 提供基本互斥设施
timed_mutex C++11 提供互斥设施,带有超时功能
recursive_mutex C++11 提供能被同一线程递归锁定的互斥设施
recursive_timed_mutex C++11 提供能被同一线程递归锁定的互斥设施,带有超时功能
shared_timed_mutex C++14 提供共享互斥设施并带有超时功能
shared_mutex C++17 提供共享互斥设施
对于上面的锁,有下列方法可以操作
lock() 锁定mutex,如果mutex不可用,则当前线程阻塞
try_lock() 尝试锁定mutex,如果mutx不可用,直接返回
unlock() 解锁mutex
上面不同类型的锁在三个方面对基础的mutex进行了拓展
- 超时:
timed_mutex,recursive_timed_mutex,shared_timed_mutex的名称都带有timed,这意味着它们都支持超时功能。它们都提供了try_lock_for和try_lock_until方法,这两个方法分别可以指定超时的时间长度和时间点。如果在超时的时间范围内没有能获取到锁,则直接返回,不再继续等待。 - 可重入:
recursive_mutex和recursive_timed_mutex的名称都带有recursive。可重入或者叫做可递归,是指在同一个线程中,同一把锁可以锁定多次。这就避免了一些不必要的死锁。 - 共享:
shared_timed_mutex和shared_mutex提供了共享功能。对于这类互斥体,实际上是提供了两把锁:一把是共享锁,一把是互斥锁。一旦某个线程获取了互斥锁,任何其他线程都无法再获取互斥锁和共享锁;但是如果有某个线程获取到了共享锁,其他线程无法再获取到互斥锁,但是还有获取到共享锁。这里互斥锁的使用和其他的互斥体接口和功能一样。而共享锁可以同时被多个线程同时获取到(使用共享锁的接口见下面的表格)。共享锁通常用在读者写者模型上。
使用共享锁的接口如下:
lock_shared获取互斥体的共享锁,如果无法获取则阻塞
try_lock_shared尝试获取共享锁,如果不可用,直接返回
unlock_shared解锁共享锁
一个示例程序:
void concurrent_worker(int min, int max) {
  double tmp_sum = 0;
  for (int i = min; i <= max; i++) {
    tmp_sum += sqrt(i); // ①
  }
  exclusive.lock(); // ②
  sum += tmp_sum;
  exclusive.unlock();
}
void concurrent_task(int min, int max) {
  auto start_time = chrono::steady_clock::now();

  unsigned concurrent_count = thread::hardware_concurrency();
  cout << "hardware_concurrency: " << concurrent_count << endl;
  vector<thread> threads;
  min = 0;
  sum = 0;
  for (int t = 0; t < concurrent_count; t++) {
    int range = max / concurrent_count * (t + 1);
    threads.push_back(thread(concurrent_worker, min, range)); // ③
    min = range + 1;
  }
  for (int i = 0; i < threads.size(); i++) {
    threads[i].join();
  }

  auto end_time = chrono::steady_clock::now();
  auto ms = chrono::duration_cast<chrono::milliseconds>(end_time - start_time).count();
  cout << "Concurrent task finish, " << ms << " ms consumed, Result: " << sum << endl;
}
我们用锁的粒度(granularity)来描述锁的范围。细粒度(fine-grained)是指锁保护较小的范围,粗粒度(coarse-grained)是指锁保护较大的范围。出于性能的考虑,我们应该保证锁的粒度尽可能的细。并且,不应该在获取锁的范围内执行耗时的操作,例如执行IO。如果是耗时的运算,也应该尽可能的移到锁的外面。如上代码,如果在for loop里对每次计算都加锁,那么执行时间反而会大幅增加。
如过我们有多个锁,要求每个task都必须锁上全部才能执行,那就有可能陷入死锁。C++ 11标准中为我们提供了一些工具来避免因为多把锁而导致的死锁。我们只要直接调用这些接口就可以了。下面提到的两个函数,它们都支持传入多个Lockable对象。
template <class Mutex1, class Mutex2, class... Mutexes> void lock (Mutex1& a, Mutex2& b, Mutexes&... cde);
template <class Mutex1, class Mutex2, class... Mutexes> int try_lock (Mutex1& a, Mutex2& b, Mutexes&... cde);
我们同时来获取多把锁,标准库的实现保证了不会发生死锁。
Mutex 管理
| API | C++标准 | 说明 |
|---|---|---|
lock_guard |
C++11 | 实现严格基于作用域的互斥体所有权包装器 |
unique_lock |
C++11 | 实现可移动的互斥体所有权包装器 |
shared_lock |
C++14 | 实现可移动的共享互斥体所有权封装器 |
scoped_lock |
C++17 | 用于多个互斥体的免死锁 RAII 封装器 |
| 锁定策略 | C++标准 | 说明 |
|---|---|---|
defer_lock |
C++11 | 类型为 defer_lock_t,不获得互斥的所有权 |
try_to_lock |
C++11 | 类型为try_to_lock_t,尝试获得互斥的所有权而不阻塞 |
adopt_lock |
C++11 | 类型为adopt_lock_t,假设调用方已拥有互斥的所有权 |
如上一节所说,为避免死锁,我们需要同时把所有的锁锁住。假设现在我们处在用一个账户给另一个账户转钱的情境中,我们需要每个账户都有自己的锁,在转钱时,要同时锁住两个账户的锁。
lock(*accountA->getLock(), *accountB->getLock());
lock_guard lockA(*accountA->getLock(), adopt_lock);
lock_guard lockB(*accountB->getLock(), adopt_lock);
如果使用unique_lock这三行代码还有一种等价的写法:
unique_lock lockA(*accountA->getLock(), defer_lock);
unique_lock lockB(*accountB->getLock(), defer_lock);
lock(*accountA->getLock(), *accountB->getLock());
注意这里lock方法的调用位置。这里先定义unique_lock指定了defer_lock,因此实际没有锁定互斥体,而是到第三行才进行锁定。
最后,借助scoped_lock,我们可以将三行代码合成一行,这种写法也是等价的。
scoped_lock lockAll(*accountA->getLock(), *accountB->getLock());
scoped_lock会在其生命周期范围内锁定互斥体,销毁的时候解锁。同时,它可以锁定多个互斥体,并且避免死锁。
Condition Varible
Condition variable 通常和一个时间或变量联系到一起,通常来说,一个线程会
- 改变变量然后通知其他线程
- 或者等待某个变量满足条件
| API | C++标准 | 说明 |
|---|---|---|
| condition_variable | C++ 11 | 提供与 std::unique_lock 关联的条件变量 |
| condition_variable_any | C++ 11 | 提供与任何锁类型关联的条件变量 |
| notify_all_at_thread_exit | C++ 11 | 安排到在此线程完全结束时对 notify_all 的调用 |
| cv_status | C++ 11 | 列出条件变量上定时等待的可能结果 |
一个简单例子
#include <condition_variable>
#include <iostream>
#include <thread>

std::mutex mutex_;
std::condition_variable condVar;
bool dataReady{false};

void waitingForWork(){
    std::cout << "Waiting " << std::endl;
    std::unique_lock<std::mutex> lck(mutex_);
    condVar.wait(lck, []{ return dataReady; });   // (4)
    std::cout << "Running " << std::endl;
}

void setDataReady(){
    {
        std::lock_guard<std::mutex> lck(mutex_);
        dataReady = true;
    }
    std::cout << "Data prepared" << std::endl;
    condVar.notify_one();                        // (3)
}

int main(){
  std::cout << std::endl;
  std::thread t1(waitingForWork);               // (1)
  std::thread t2(setDataReady);                 // (2)
  t1.join();
  t2.join();
  std::cout << std::endl;
}
上面的程序有两个thread, 一个setDataReady【2】,另一个waitingForWork【1】。t2通过lock_guard上锁然后改变dataReady,通过notify_one()【3】通知等待这个条件变量condVar的另外一条线程。 线程t1通过条件变量进行等待,他会通过pred(即那个lambda表达式)来判断条件是否满足,如果满足会继续。如果不满足就解锁锁,然后当前线程陷入等待。这样其他线程才能获得锁。这里我想讨论一下notify_one() 和 notify_all()的区别,如果我没记错,他们在linux下分别对应pthread_cond_signal和pthread_cond_broadcast。一个是唤醒至少一个阻塞在当前条件变量的线程,如果有不止一个线程在等待当前条件变量,调度策略会决定哪一个线程将结束阻塞;另外一个是唤醒所有的阻塞在当前条件变量的线程,这些线程需要去竞争锁。看上去notify_all()是notify_one()的超集,但是我们需要考虑具体的业务场景,如果只需要众多线程中的一个去处理,那实在没有必要去notify_all().
运行结果
Waiting
Data prepared
Running
为什么我们需要在【4】有一个pred而不是直接去等待这个条件变量呢,在此之前,我们先介绍两种现象,一种是lost wakeup, 另外一种是spurious wakeup。 前者是指在接受线程进入等待状态前,发送线程就已经发送了通知,后果就是这个通知丢了,接受线程会永远等待下去。后者是指没有通知发送,但是还是有接受线程醒来。而pred就是为了避免这两种现象。
在上面的例子里,线程t1会先锁住mutex,然后去查看pred []{return dataReady;},如果pred返回true那么线程继续工作,返回false那么condVar.wait()解锁mutex,然后进入等待/阻塞状态。当condVar处于等待状态时,收到一个通知,他会从从阻塞中恢复并获取mutex锁,然后检查pred,如果pred是true则继续工作,false那么condVar.wait()解锁mutex,然后进入等待/阻塞状态. 如果去掉pred,那么我们可能会陷入死锁
Data prepared
Waiting
这是因为t1还没有进入等待状态时,t2就已经发送了通知,所以t1会永远等下去。 而加了pred,它对应
while (!pred()) {
    wait(lock);
}
这样不仅避免了lost wakeup,也解决了spurious wakeup。当然,对于一些复杂情况,比如A则执行actionA,B则执行actionB,用没有pred的wait()会有更好的性能。这也是为社么cpp有不含pred的重载
e.g.
cond.wait(lock, []{return (A || B);});
if(A) {
    actionA();
}
else {
    actionB();
}
需要检测条件两次,而
while(true)
{
    if(A) {
         actionA();
         break;
    }
    else if(B) {
         actionB();
         break;
    }
    cond.wait(lock);
}
对于每种情况只检测一次。
Reference
- https://eli.thegreenplace.net/2016/c11-threads-affinity-and-hyperthreading/
- https://paul.pub/cpp-concurrency/
- https://www.modernescpp.com/index.php/c-core-guidelines-be-aware-of-the-traps-of-condition-variables